Miner API Command Control in Home Assistant
Exergy LLC
Version: 1.0 | Date: January 02, 2026 | Block Height: 921234
This guide explains how to send commands to bitcoin miners in Home Assistant, using Node-RED and direct API calls tailored to your miner’s documentation.
Node-RED is a visual, flow-based programming tool that enables low-code creation of event-driven applications by connecting devices, APIs, and services. When integrated with Home Assistant, it provides powerful capabilities for complex automations and seamless interaction with custom or unsupported systems, like miner APIs using HTTP requests or shell commands.
Goals: Turn miners on/off, switch modes, and adjust power levels—adaptable to various miners, with examples using the Canaan Avalon Mini 3.
Table of Contents
- Introduction: Hashrate Heating - Not Bitcoin Mining Heat Reuse
- Prerequisites: What You’ll Need to Get Started
- Miner API Documentation: Your Reference Guide
- Step 1: Setting Up the IP Address Input in Home Assistant
- Node-RED Flows Overview: The Big Picture
- Step 2: Building the Turn On Miner Flow
- Step 3: Building the Turn Off Miner Flow
- Modes and Levels Explained: Understanding Your Miner’s Options
- Step 4: Building Flows to Change Modes
- Step 5: Building Flows to Change Levels
- Next Steps and Future Guides: Where to Go From Here
- Contact: We’re Here to Help
Introduction: Why Node Red over other Automation Methods?
This guide shows how to send API commands to bitcoin miners (examples using the Canaan Avalon Mini 3) via Node-RED in Home Assistant, enabling custom control beyond standard mobile apps.
Node-RED is a powerful visual flow-based tool that shines for complex automations involving miners or other unsupported devices. Compared to alternatives in Home Assistant, it offers clear advantages:
- Handles complexity easily: Branching logic, loops, timers, data transformation, error handling, and multi-step sequences are straightforward with drag-and-drop flows—far simpler than dense YAML automations or the limited GUI editor.
- No/low code: Build sophisticated logic visually without writing full scripts, while still allowing JavaScript snippets when needed.
- Excellent for custom APIs: Directly integrate devices without official HA integrations using HTTP, TCP, WebSocket, or shell nodes—perfect for miner APIs.
- Reusable & modular: Shared subflows, easy debugging (live data view on wires), and quick iteration speed up development.
- Reliable & observable: Flows run independently, restart gracefully, and provide visual monitoring of exactly what’s happening in real time.
- Advanced scenarios enabled: Fleet control (broadcast to multiple miners), profitability-based switching (combine hashprice, solar production, electricity rates), thermostat integration, or scheduled mode changes—all become manageable without custom Python scripts or workarounds.
If your needs are simple (e.g., one button to turn a device on/off), HA’s built-in automations or YAML may suffice. Dive into Node-RED when you want more power, clarity, and maintainability for intricate development or custom miner setups.
Prerequisites: What You’ll Need to Get Started
Before we jump in, make sure you have these basics.
| Item | Requirement | Quick Tip for Beginners |
|---|---|---|
| Miner | Any bitcoin miner with a public API, connected to your network (examples use Canaan Avalon Mini 3) | Check its IP in the manufacturer app or on the device screen. |
| Home Assistant | Installed on the same network (home-assistant.io) | If new, start with a Raspberry Pi setup; it’s like a local smart home brain. |
| Node-RED | Add-on installed and running (github.com/hassio-addons/addon-node-red) | In Home Assistant, go to Settings > Add-ons > Add-on Store, search for Node-RED. |
| HACS (Home Assistant Community Store) | Installed (hacs.xyz) | This is a community store for extra services—install via Home Assistant’s integrations. |
| Node-RED Companion | Installed and configured (github.com/zachowj/hass-node-red) | Adds Home Assistant nodes to Node-RED; install via HACS > Integrations. |
Actionable Steps if Needed:
- Install Home Assistant if you haven’t (follow their quick start guide).
- Add Node-RED via the add-on store.
- Install HACS and Node-RED Companion (search online for “install HACS Home Assistant” for video tutorials).
Once set up, open Node-RED from Home Assistant (usually at your Home Assistant IP:1880 or open from the Add-Ons page).
Miner API Documentation: Your Reference Guide
For all the technical details on what commands your miner understands, refer to your manufacturer’s official API docs (for Canaan Avalon Mini 3 examples: www.canaan.io/resource/api/avalon-mini-3).
Overview: Think of the API as a menu of commands. We’ll use a few simple ones here, no need to read it all now, but bookmark it for later. Adapt the syntax to match your miner’s API while following the Node-RED patterns in this guide.
Step 1: Setting Up the IP Address Input in Home Assistant
Your miner’s IP address (like its network “home address”) might change occasionally, so we’ll create a spot in Home Assistant to store and update it easily. This is an input_text helper, a simple text box entity.
Overview: This entity holds the IP, which Node-RED will read to send commands. It’s beginner-friendly and avoids hardcoding, allowing the IP to be changed easily if needed. For fleets, you could expand this to multiple inputs or a list.
Actionable Steps:
- In Home Assistant, click Settings (gear icon) > Devices & Services > Switch to the Helpers tab at the top.
- Click + Create helper at the bottom.
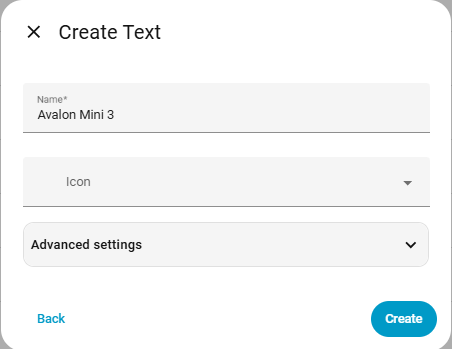
- Search for and select Text.
- Name it something clear, like “Miner IP”. Add an icon if you want (e.g., a network icon). Leave advanced settings as default.
- Click Create. Your new helper appears in the list.

- Click the entity, enter your miner’s IP (from the manufacturer app or miner screen), and save.


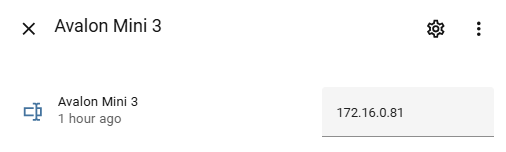
Entity ID Note: It’ll be something like input_text.miner_ip. Jot this down; you’ll use it in Node-RED.
Alternative for Advanced Users: You can create this in Node-RED, but the HA UI is simpler for beginners.
Node-RED Flows Overview: The Big Picture
Node-RED lets you build “automation flows” like visual diagrams. Our flows will all share two key nodes: one to grab the IP from Home Assistant, and one to send the command to the miner. This modular approach makes it easy to adapt for different miners by swapping command formats.
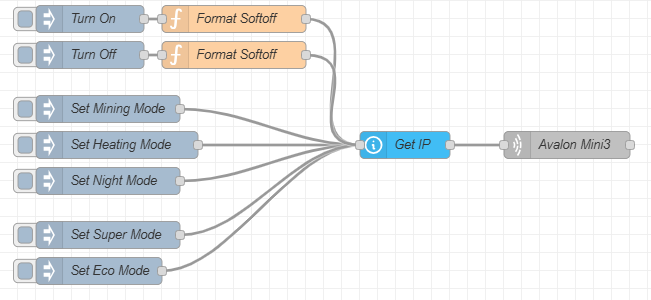
Overview (Not Steps Yet): All commands flow like this: Trigger (button) → Prepare Command → Get IP → Send to Miner. We’ll reuse the “Get IP” and “Send” nodes to keep it clean. For other miners, adjust the command preparation based on their API (e.g., HTTP instead of TCP if needed).
This is our end goal:
Shared Node Configurations (Reference for Later Steps):
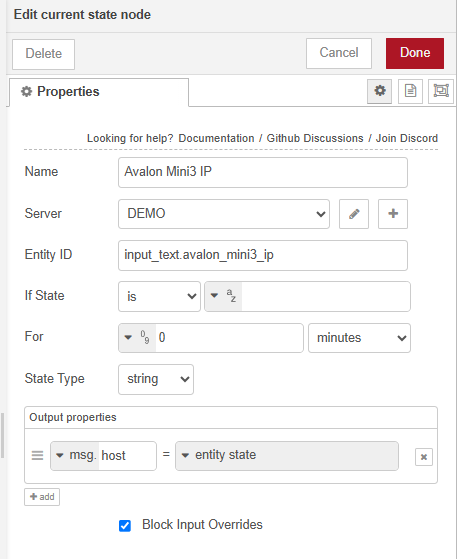
- Current State Node (Gets the IP):

- Name: “Get Miner IP”
- Server: Should auto-select “Home Assistant”.
- Entity ID: Your input_text (e.g.,
input_text.miner_ip). - If State: Leave default.
- Output Properties: Set to
msg.host= “entity state”.
- TCP Request Node (Sends the command; adapt to HTTP if your miner uses that):

- Server (IP): Leave blank (it uses msg.host from above).
- Port: 4028 (or your miner’s port).
- Return: Buffer.
- Close: After a fixed timeout of 0 ms.
- Name: “Send to Miner”.
Remember to Deploy (top-right button) after adding nodes.

Step 2: Building the Turn On Miner Flow
This flow turns the miner on using a “turn on” API command (e.g., “softon” for Canaan Avalon Mini 3). It wakes the miner to its last mode and may need a future timestamp (we’ll add 8 seconds for reliability, as in the Mini 3 example).
Overview: The miner expects a command like ascset|0,softon,1:1234567890 (adapt for your API). We generate that dynamically in Node-RED.
Actionable Steps in Node-RED:
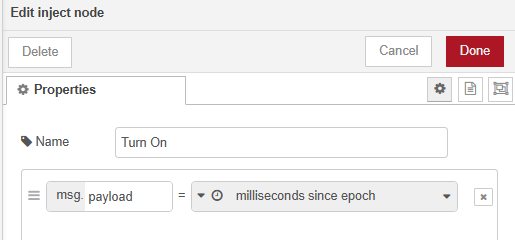
- Open Node-RED. Drag an Inject node from the left palette (under “common”).

- Set Payload to “timestamp” (it grabs the current time when clicked).
- Name: “Turn On”.
- Drag a Function node and connect it to the Inject (wire from right of Inject to left of Function).

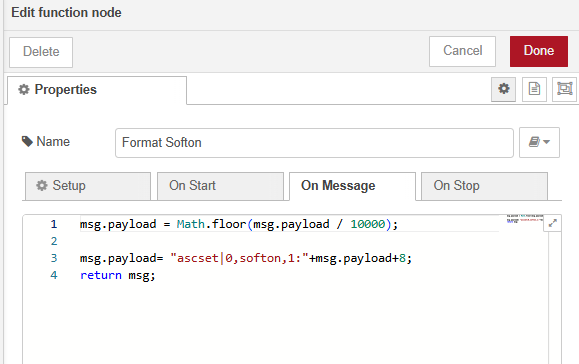
- Name: “Format Turn On Command”.
- Paste this code (Mini 3 example; adjust syntax for your miner):
msg.payload = Math.floor(msg.payload / 10000);
msg.payload = "ascset|0,softon,1:" + msg.payload + 8;
return msg;
- Drag a Current State node (under “home assistant”) and connect it after the Function.
- Configure as in the shared overview above.
- Drag a TCP Request node (under “network”) and connect it last.
- Configure as in the shared overview (or switch to HTTP for non-TCP APIs).
- Deploy and test: Click the Inject button—your miner should turn on in ~8 seconds!
If you prefer importing: Use the full JSON in the “Importable Flow” section below.
Step 3: Building the Turn Off Miner Flow
Similar to Turn On, but uses a “turn off” command (e.g., “softoff” for Canaan Avalon Mini 3) to put the miner in standby.
Overview: Almost identical—just change one word in the command (adapt for your API).
Actionable Steps:
- Copy the entire Turn On flow (drag to select nodes, Ctrl+C, Ctrl+V).
- Double-click the copied Function node.
- Change the code to (Mini 3 example):
msg.payload = Math.floor(msg.payload / 10000); msg.payload = "ascset|0,softoff,1:" + msg.payload + 8; return msg; - Name: “Format Turn Off Command”.
- Change the code to (Mini 3 example):
- Update the Inject name to “Turn Off”.
- Deploy and test.
Modes and Levels Explained: Understanding Your Miner’s Options
Before building more flows, let’s overview what these do, so you know why you’re setting them. Modes and levels vary by miner; consult your API docs for specifics.
Overview: Many miners have modes for different uses and levels for power/hashrate balance (examples from Canaan Avalon Mini 3).
- Mining Mode: Runs full-speed for mining (continuous, no temp control).
- Heating Mode: Acts like a thermostat—heats to a temp you set in the app, cycling on/off—dependent on temperature sensors.
- Night Mode: Same as Heating, but with reduced noise/lights.
Levels:
| Level | Hashrate | Power Draw | Notes |
|---|---|---|---|
| Super | 37–40 TH/s | 800–850 W | High performance; may be default for Mining mode. |
| Eco | 25–30 TH/s | 450–500 W | Efficient; available in Heating/Night. |
| Tip: Set temps in your miner app first. Check your miner’s docs for details and equivalent commands. | |||
| No steps here, back to building! |
Step 4: Building Flows to Change Modes
These use “mode change” commands (e.g., “workmode” for Canaan Avalon Mini 3)—no timestamp needed like on/off, so simpler flows.
Overview: One flow per mode, all connecting to the shared Get IP and Send nodes. Adapt commands per your API.
Actionable Steps:
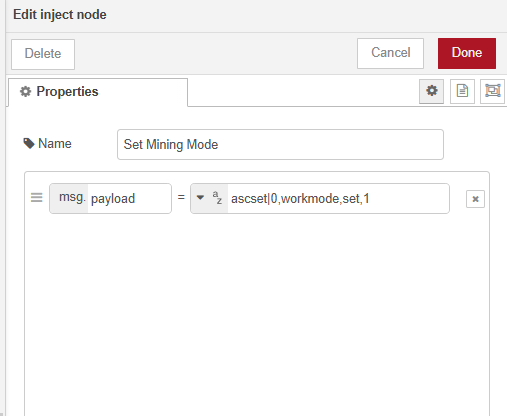
- For each mode (e.g., Mining, Heating, Night): Drag an Inject node.
- Set Payload to “string” and enter the command (Mini 3 examples):
- Mining:
ascset|0,workmode,set,1 - Heating:
ascset|0,workmode,set,0 - Night:
ascset|0,workmode,set,2
- Mining:
- Name accordingly (e.g., “Set Mining Mode”).
- Set Payload to “string” and enter the command (Mini 3 examples):
- Connect each Inject directly to your shared Current State node (which goes to TCP Request).
- Deploy and test each button.
Step 5: Building Flows to Change Levels
Similar to modes, using “level change” commands (e.g., “worklevel” for Canaan Avalon Mini 3).
Overview: Adjusts power; may be ignored in certain modes—check your API.
Actionable Steps:
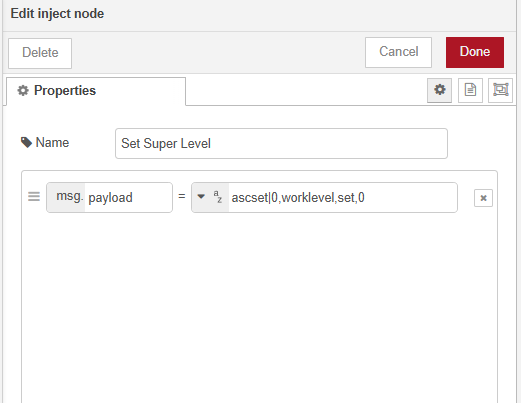
- For each level (e.g., Super, Eco): Drag an Inject node.
- Payload (string, Mini 3 examples):
- Super:
ascset|0,worklevel,set,0 - Eco:
ascset|0,worklevel,set,-1
- Super:
- Name accordingly (e.g., “Set Super Level”).
- Payload (string, Mini 3 examples):
- Connect to shared nodes.
- Deploy and test.
Full Importable Flow JSON (All Commands in One)
If building manually feels overwhelming, import this into Node-RED (Menu > Import > Paste > Select new flow):
[{"id":"avalon_control_group","type":"group","name":"Miner Control","nodes":["turn_on_inject","turn_on_function","turn_off_inject","turn_off_function","mode_mining_inject","mode_heating_inject","mode_night_inject","level_super_inject","level_eco_inject","shared_current_state","shared_tcp"]},{"id":"turn_on_inject","type":"inject","z":"e3c274d6cee806d6","name":"Turn On","props":[{"p":"payload"},{"p":"topic","vt":"str"}],"repeat":"","crontab":"","once":false,"onceDelay":0.1,"topic":"","payload":"","payloadType":"date","x":160,"y":80,"wires":[["turn_on_function"]]},{"id":"turn_on_function","type":"function","z":"e3c274d6cee806d6","name":"Format Turn On Command","func":"msg.payload = Math.floor(msg.payload / 10000);\nmsg.payload = \"ascset|0,softon,1:\" + msg.payload + 8;\nreturn msg;","outputs":1,"timeout":"","noerr":0,"initialize":"","finalize":"","libs":[],"x":340,"y":80,"wires":[["shared_current_state"]]},{"id":"turn_off_inject","type":"inject","z":"e3c274d6cee806d6","name":"Turn Off","props":[{"p":"payload"},{"p":"topic","vt":"str"}],"repeat":"","crontab":"","once":false,"onceDelay":0.1,"topic":"","payload":"","payloadType":"date","x":160,"y":120,"wires":[["turn_off_function"]]},{"id":"turn_off_function","type":"function","z":"e3c274d6cee806d6","name":"Format Turn Off Command","func":"msg.payload = Math.floor(msg.payload / 10000);\nmsg.payload = \"ascset|0,softoff,1:\" + msg.payload + 8;\nreturn msg;","outputs":1,"timeout":"","noerr":0,"initialize":"","finalize":"","libs":[],"x":340,"y":120,"wires":[["shared_current_state"]]},{"id":"mode_mining_inject","type":"inject","z":"e3c274d6cee806d6","name":"Set Mining Mode","props":[{"p":"payload"}],"repeat":"","crontab":"","once":false,"onceDelay":0.1,"topic":"","payload":"ascset|0,workmode,set,1","payloadType":"str","x":180,"y":180,"wires":[["shared_current_state"]]},{"id":"mode_heating_inject","type":"inject","z":"e3c274d6cee806d6","name":"Set Heating Mode","props":[{"p":"payload"}],"repeat":"","crontab":"","once":false,"onceDelay":0.1,"topic":"","payload":"ascset|0,workmode,set,0","payloadType":"str","x":180,"y":220,"wires":[["shared_current_state"]]},{"id":"mode_night_inject","type":"inject","z":"e3c274d6cee806d6","name":"Set Night Mode","props":[{"p":"payload"}],"repeat":"","crontab":"","once":false,"onceDelay":0.1,"topic":"","payload":"ascset|0,workmode,set,2","payloadType":"str","x":180,"y":260,"wires":[["shared_current_state"]]},{"id":"level_super_inject","type":"inject","z":"e3c274d6cee806d6","name":"Set Super Level","props":[{"p":"payload"}],"repeat":"","crontab":"","once":false,"onceDelay":0.1,"topic":"","payload":"ascset|0,worklevel,set,0","payloadType":"str","x":180,"y":320,"wires":[["shared_current_state"]]},{"id":"level_eco_inject","type":"inject","z":"e3c274d6cee806d6","name":"Set Eco Level","props":[{"p":"payload"}],"repeat":"","crontab":"","once":false,"onceDelay":0.1,"topic":"","payload":"ascset|0,worklevel,set,-1","payloadType":"str","x":180,"y":360,"wires":[["shared_current_state"]]},{"id":"shared_current_state","type":"api-current-state","z":"e3c274d6cee806d6","name":"Get Miner IP","server":"","version":3,"outputs":1,"halt_if":"","halt_if_type":"str","halt_if_compare":"is","entity_id":"input_text.miner_ip","state_type":"str","blockInputOverrides":true,"outputProperties":[{"property":"host","propertyType":"msg","value":"","valueType":"entityState"}],"for":"0","forType":"num","forUnits":"minutes","override_topic":false,"state_location":"payload","override_payload":"msg","entity_location":"data","override_data":"msg","x":540,"y":200,"wires":[["shared_tcp"]]},{"id":"shared_tcp","type":"tcp request","z":"e3c274d6cee806d6","name":"Send to Miner","server":"","port":"4028","out":"time","ret":"buffer","splitc":"0","newline":"","trim":false,"tls":"","x":740,"y":200,"wires":[[]]}]
You should get this after importing:
Post-Import Steps: Double-click “Get Miner IP” and set your Entity ID from the Text Helper you created at the beginning. Deploy!
Congrats, you’ve built a basic control system using Node-RED!
Next Steps and Future Guides: Where to Go From Here
Stay tuned for Exergy’s upcoming tutorials:
- A guide for sending API commands to other miner models.
- Parsing stats like hashrate and temps from miners.
- Creating a dashboard in Home Assistant to control and monitor your miner stats.
- Integrating with a smart thermostat for auto-heating and more!
Contact: We’re Here to Help
Got questions or need tweaks? Reach out! We’re a small team but passionate about this stuff.
- Email: contact@exergyheat.com
- Twitter: https://x.com/Exergy_LLC